Saturday 28 April 2018

Vellum Challenge - Lots of Lavender

Hello, I stumbled across a design challenge the other week, on one of the groups that I'm in. We were asked to create a card incorporating vellum. Still feeling inspired by my recent makes I decided to join in and submit something. Originally I had wanted to emboss on vellum but when I ran it through the Big Shot, it cracked and split. I'm sure there are ways around it, but I honestly didn't have the time to research and experiment. Another job added to my crafty list.

So, a very quick design change ensued. Possibly resulting in a better effect than had originally been planned. I decided to use Lots of Lavender, one of the stamp sets I received for free during Sale a bration.


First of all I cut a piece of vellum to 2" width and used the Scalloped Tag Topper on it. I did the same with a piece of Whisper White card stock too.


Next I heat embossed my design and coloured it in on the reverse. I inked up my sentiment with Versamark and then Berry Burst and stamped in onto the vellum. It was then heat embossed using clear emboss powder. Sadly the shine of the sentiment doesn't show up in the photo. I rounded the edges on the tags and held them together with a glue dot. A little piece of ribbon I aquired covered the glue dot, one gem was placed onto it. In the end I  managed to dry emboss - but on normal Whisper White card.


I hope you like the result.

Bev🎕

Thank you for viewing my blog today. I'd be very happy to be your Stampin' Up! Demonstrator if you don't already have one. If you would like a copy of the current catalogue, I can arrange for you to receive one if you contact me.

If you'd like to place an order for any current items, please click on the "Shop With Me 24/7" button near the top of the page or alternately, click on the product links below.


Tuesday 24 April 2018

Post It Note holders - part 2

Hello, I recently been making Post It Note holders for (hopefully) a craft fair. One particular style included space for a pen, unfortunately it wasn't as sturdy as I'd hoped. So, with that in mind I decided to take a design that I liked by Lea Denton and adapt it to include the space for a pen. Having bought some the other day, I felt I should make the effort to use them...

I'm so pleased that I can remember how to add fractions! Working out the size of card needed and where to place score lines certainly made me think. It's a perfect way to use up retired colours and DSP although I've used a mix of old and new.

DSP works well with the stamp from A Good Day

Recipe

Cardstock 3" x 10"
Score at 3", 3½", 3", 7" and 7¾"


Diagonally score from corner to corner on one of the end squares


White or vanilla cardstock   3"x3⅜" and 2 of 3"x3"
DSP 2¾"x3⅛" and 2 of 2¾" x2¾"


Fold and burnish the score lines. Where the 3 lines are, fold on the centre line and make 2 cuts for the pen, only cutting to the next line.


Taking care, push the card in as shown on the photo, leaving the centre out.


Turn the holder over, and either use wet glue or tape as shown and stick downwards so that the flaps are stuck to the base.


Press down firmly to adhere.


Place a magnet near to the centre of the long edge of the diagonal and fold the flap over and stick down well so that the magnet remains in place. I find it easier to get the magnet placement right if I stick the Post It notes in before I place the 2nd magnet on top of the first.


The magnets attract so just put a glue dot on the back of it. As I fold the flap over, the glue dot adheres to the oppsosite flap as shown in the picture below
.

Cover the back, and square flap both inside and out with DSP. Again, this will enclose the magnet.


Once this is completed, decorate to suit.


I hope you understand my instructions, please contact me if I haven't made them clear enough.


As you can see, I got a little carried away. I will be making more of these as soon as I replenish my stock of Post It Notes.

Bev🎕

Thank you for viewing my blog today. I'd be very happy to be your Stampin' Up! Demonstrator if you don't already have one. If you would like a copy of the current catalogue, I can arrange for you to receive one if you contact me.

If you'd like to place an order for any current items, please click on the "Shop With Me 24/7" button near the top of the page or alternately, click on the product links below.


Saturday 21 April 2018

Will it be the Summer or Christmas Fair...

Hello and welcome, I'm so pleased you stopped by for a look. Today I'm thinking of ideas for craft fairs; hopefully I'll have enough for the Summer Fair at work. If not I'll be trying to organise storage for my makes until Christmas. I'm lucky enough to work in a local college so I can hijack a stall to dip my toe in the water.

I've seen various Post-It Note holders on both Pinterest and You Tube so thought I'd have a go. I bought several packs of Post-It Notes ages ago and only used around three of them so this will ease my conscience somewhat. I have had to order some magnets for this particular design by Lea Denton though - oops!

Fussy cut flowers

I have made Post It holders before that incorporate a pen but I feel that although they look lovely and are very easy to make if constructing a large batch, they appear a little too flimsy. Lea's design is very sturdy, having tiny Neodymium magnets to close it. These magnets are brilliant, very stong but can shatter if dropped so care is needed when using them.

Sweet Soiree Speciality DSP

While I've used a current designer series paper, this is a great way of using up some retired paper or cardstock as you can see below.


Bev🎕

Thank you for viewing my blog today. I'd be very happy to be your Stampin' Up! Demonstrator if you don't already have one. If you would like a copy of the current catalogue, I can arrange for you to receive one if you contact me.

If you'd like to place an order for any current items, please click on the "Shop With Me 24/7" button near the top of the page or alternately, click on the product links below.


Tuesday 17 April 2018

Wednesday Sketch Challenge, 28th March - 11th April

Hello, after showcasing some of my designs in a crafty Facebook group, I was invited to join in the latest Wednesday Sketch Challenge. I rarely do join in but this time, having woken during the night with an idea, I thought I'd have a go.

My apologies if you're getting fed up of In The City, I promise I'll put it back on the shelf soon - honest.


I sometimes use design sketches as a kick start when my mojo has left the building. I find them far less restrictive as you can choose whatever stamp set you want to use. Also, you can get totally different looking cards by carefully selecting your embellishments even with the same layout.


I chose to use Lots of Labels for the 2.5"x3.5" element; while the right height, it just falls slightly short on width but I think it should be ok. I stamped the cloud and sun to create my own DSP for the full length strip. It's a little difficult to see. Sadly I didn't think to photograph it before adding to the card base; each element shows up better in real life.


I used the sentiment "May the adventures continue" from the Glamper Greetings photopolymer stamp set as I thought it could be used for a moving or leaving card. It would also be suitable for someone travelling on a gap year. Let's be honest, we're all begininning to think of our Summer holidays after such a dreary Winter.

Bev🎕

Thank you for viewing my blog today. I'd be very happy to be your Stampin' Up! Demonstrator if you don't already have one. If you would like a copy of the current catalogue, I can arrange for you to receive one if you contact me.

If you'd like to place an order for any current items, please click on the "Shop With Me 24/7" button near the top of the page or alternately, click on the product links below.


Saturday 14 April 2018

Loving In The City

Hello again, in my last post I had such fun with the stamp set In The City that I didn't want to put it away. As I explained, there are so many tiny stamps that you can create cards for most occasions, the only limitation is your imagination.


Once I'd started stamping ideas flowed... but I did find I was a little indecisive at one stage. To colour the background...


...or not to colour? Which do you prefer?


As you can see, in the end I decided that the main image "popped" more with a coloured background.


I also used some Whisper White paper scraps to stamp on - this set is a great way to use up those tiny pieces that you just can't bear to throw out.


The next card is for a wedding. I stamped and coloured this at the same time as the previous one to save time. I love the limousine, especially with the cans behind!


I hope you you like them both. Cards really don't have to be complicated, I really do believe that often less is more.

Bev🎕

Thank you for viewing my blog today. I'd be very happy to be your Stampin' Up! Demonstrator if you don't already have one. If you would like a copy of the current catalogue, I can arrange for you to receive one if you contact me.

If you'd like to place an order for any current items, please click on the "Shop With Me 24/7" button near the top of the page or alternately, click on the product links below.


Tuesday 10 April 2018

In The City

Hello and welcome, not so long ago I placed a large order to ensure I got the Stampin'Up! goodies I needed - well ok, wanted - before the possibility of them retiring. We won't know the retiring list just yet, but when it's published (very soon) the stock flies off the shelves. It really is a case of if you want it, get in there quickly. Anyway, I don't know about you, but I tend to get a tad overwhelmed when I get loads of new stock. Now I have various tricks up my sleeve for such times; using a sketch challenge, looking online or picking one stamp set to work with.

And so, this is how I came to use In The City. It's a hostess set, free with a qualifying order. I really couldn't make up my mind about it at first. However, there are so many tiny images in this set that the possibilities are virtually endless. You really could create your own city with this set! Also, almost every occasion can be covered too.


I started by selecting the size of square die I wanted to use so I knew the space I had to work with within the frame. I made pencil marks in each corner for reference. Then I set to with the stamping. Some of these dies are very tiny; I put each one back in the box as soon as I'd used and cleaned it, regardless of whether I'd need it again. Well, have you ever had to search a patterned carpet for a photopolymer stamp half the size of your pinky fingernail? Not much fun I can assure you, although happily perseverance paid off. Although quite a while ago, it was a lesson well learnt.


I also stamped a car and a couple of trees onto scrap card and fussy cut them out.


I happen to like lots of white space on my cards. This one echos the pink of the sack the stork is carrying with the mat and layering. I stamped the cobbles onto the Whisper White mat too a little below a strip of washi tape. Matching the line of cobbles up I stuck down the stamped square and carefully arranged the extra trees and car.


A simple sentiment completed the front of this card. Of course, I also decorated both the inside of the card and the envelope with the stork.

Bev🎕

Thank you for viewing my blog today. I'd be very happy to be your Stampin' Up! Demonstrator if you don't already have one. If you would like a copy of the current catalogue, I can arrange for you to receive one if you contact me.

If you'd like to place an order for any current items, please click on the "Shop With Me 24/7" button near the top of the page or alternately, click on the product links below.


Saturday 7 April 2018

Coffee, Cards, Cake... and Fruit Basket

Hello again, I finally managed to get to a Coffee and Card session held by my lovely upline, Susan of Craftyduckydoodah. I used to go regularly at one time, but now I'm back to working full-time, I can only manage to get during school holidays.

Although we often chat via messenger, it was lovely to actually catch up on the news...and even a little gossip.  Susan was able to give me a few tips for this blog so you might spot a few changes and additions. In fact we decided to meet up a bit earlier for a spot of lunch before the crafty session.


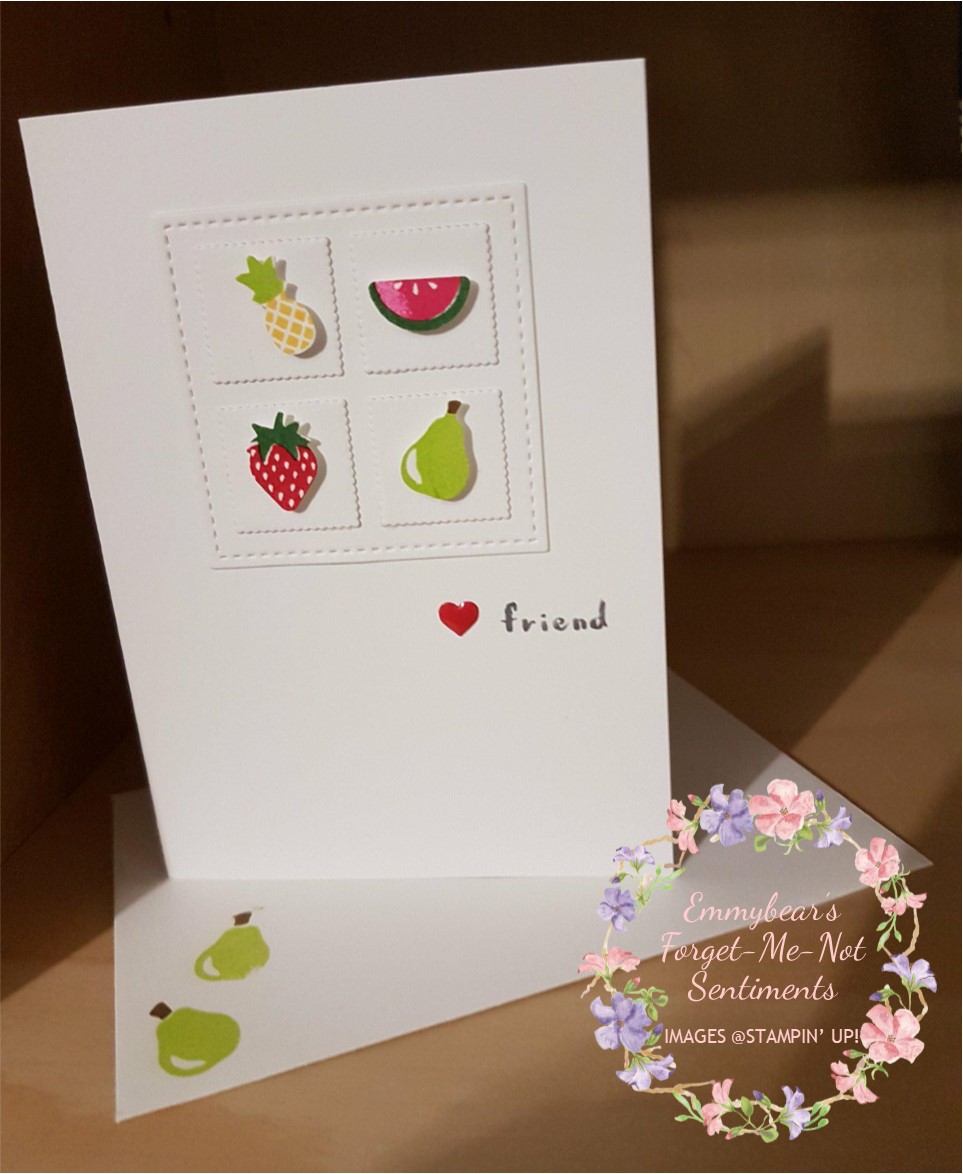
We made two cards, one a simple note card size and the other a slightly more involved A6 shaker card that used Jar of Love in conjunction with Fruit Basket. It was very therapeutic stamping the small fruits - we needed quite a few for both designs. They actually punch out slightly smaller than the stamped image so you don't end up with white edges around the image!
 
Image courtesy of Susan Simpson

For the note card, we die cut a Stitched Shape Framelit square and then layered 4 of the smallest of the Layering Squares Framelits onto it. The small squares remind me of postage stamps. I love cards with lots of white space, they always look crisp and classy.


I had intended to use pears on my card, but at the last minute changed it to one of each of the 4 fruits. The sentiment was stamped directly onto the card base using Basic Grey Archival ink which gives a softer effect than black. A small heart just added the finishing touch. As usual, both the inside of the card and the envelope were stamped for a cohesive look.


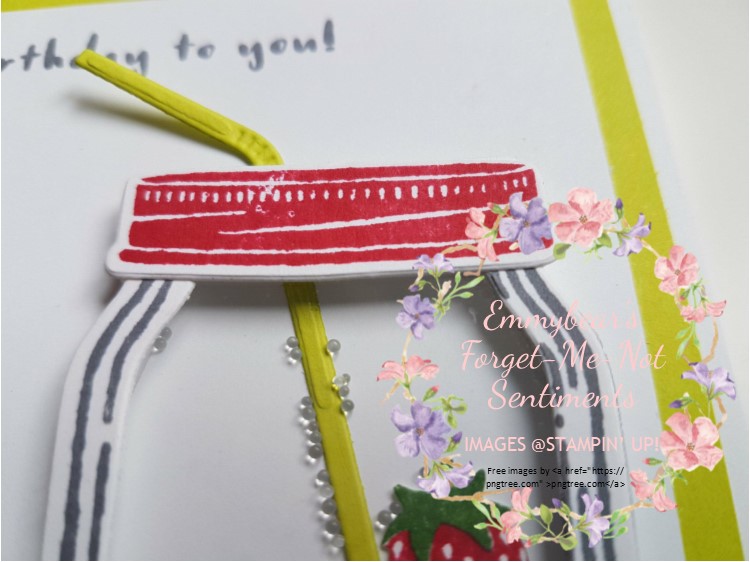
For my next card, slightly larger at A6, I went slightly off piste again with a portrait orientation. It meant that I also had to change the placement of my sentiment too in order to balance the design.


Those of you who know me will probably be quite shocked to see Washi tape on this card...
...and not just one piece but three! 
Although I have some - and have made cute little holders for each set - I rarely use it. I have no idea why; it isn't as if I don't like it or difficulty of use! Washi tape is one of the easiest and most forgiving products to use. Wrong placement? Lift it and try again - it's really that easy.


We also did our bit towards being green too. Who couldn't fail to love the little straw, die cut from card naturally. The straw is in the Bottles and Bubbles Framelit die set. There is even a right facing straw too. Stampin' Up! think of everything. Even the micro beads look just like bubbles in a fizzy drink. I was so impressed with them I had to order some right away even though they aren't a Stampin' Up! product.


Before I left the cafe, Susan gave me a lovely little gift - I'm so lucky. Between the 2 die cut aprons is a small box, just big enough for a few sweets. I received little carrot sweets in mine. Others had M and M's but you could fit a small chocolate bar in like a Freddo.

Image courtesy of Susan Simpson

I love the tiny scissors decorating the front of the apron!

Bev🎕

Thank you for viewing my blog today. I'd be very happy to be your Stampin' Up! Demonstrator if you don't already have one. If you would like a copy of the current catalogue, I can arrange for you to receive one if you contact me.

If you'd like to place an order for any current items, please click on the "Shop With Me 24/7" button near the top of the page or alternately, click on the product links below.